Automation, Sytem Engineer

Deploy Go Application Using Jenkins Pipeline

Good Morning, Guys!

Welcome back!

So, I would like to help you to deploy your Golang application to your server using Jenkins Pipeline. But first, what is Jenkins Pipeline? Well, based on Jenkins website, Jenkins pipeline is a suite of plugins which supports implementing and integrating continuous delivery pipelines into Jenkins. So, to use pipeline, We have to install its plugin first from Our Jenkins Plugin configuration page.

Next, If you never using Jenkins pipeline before, You need to know to use Pipeline script which is a Groovy language. To create pipeline script, we can create a file named Jenkinsfile and checked it into project’s source control repository. Or by write it on the Job’s configuration page.

In this example, I’ll create it on the Job’s configuration page. At My pipeline script, I will create 4 stages of deployment which is setup environment, doing test to the code, build the code, and deploy the code to server.

Here it is my pipeline script:

### setup environment: creates directories, sshagent, checking
 ### deployment date, set PATH environment

stage "setup environment"
 node('master'){
 sshagent (credentials: ['2e1b7262-0912-409f-83fb-179860abee79']){
 sh 'ssh -o StrictHostKeyChecking=no -l ec2-user 111.222.123.121'
 sh 'DATE=`ssh ec2-user@111.222.123.121 "date +%Y%m%d%H%M%S"`'
 }
 dir('/var/lib/jenkins/jobs/[your_project]/workspace/bin'){}
 dir('/var/lib/jenkins/jobs/[your_project]/workspace/pkg'){}
 dir('/var/lib/jenkins/jobs/[your_project]/workspace/'){
 sh 'rm -rf *.tar.gz'
 }
 dir('/var/lib/jenkins/jobs/[your_project]/workspace/src/bitbucket.org/[project]/[project_go]'){
 sh 'rm -rf *'
 }
 withEnv(['PATH=$PATH:/opt/go/bin:/usr/local/bin','GOROOT=/opt/go','GOPATH=/var/lib/jenkins/jobs/[your_project]/workspace/']){
 dir('/var/lib/jenkins/jobs/[your_project]/workspace/src/bitbucket.org/[project]/[project_go]') {
 git branch: 'develop', credentialsId: 'c1db80fe-1eab-43f7-bd08-f4f80b706e61', url: 'git@bitbucket.org:rezast/golang.git'
 sh 'go get github.com/spf13/viper'
 sh 'go get gopkg.in/gin-gonic/gin.v1'
 sh 'go get github.com/op/go-logging'
 sh 'go get github.com/dgrijalva/jwt-go'
 sh 'go get github.com/stretchr/testify'
 }
 }
 }

### Run test script

stage "GO Test"
 node('master'){
 withEnv(['PATH=$PATH:/opt/go/bin','GOROOT=/opt/go','GOPATH=/var/lib/jenkins/jobs/[your_project]/workspace/']){
 dir('/var/lib/jenkins/jobs/[your_project]/workspace/src/bitbucket.org/[project]/[project_go]') {
 sh 'go test bill_test.go'
 }
 }
 }
 stage "Build Go!"
 node('master'){
 withEnv(['PATH=$PATH:/opt/go/bin:','GOROOT=/opt/go','GOPATH=/var/lib/jenkins/jobs/[your_project]/workspace/']){
 dir('/var/lib/jenkins/jobs/[your_project]/workspace/src/bitbucket.org/[project]/[project_go]'){
 sh 'go install'
 }
 }
 }

### Send binary to server

stage "Deploy Go"
 node('master'){
 dir('/var/lib/jenkins/jobs/[your_project]/workspace'){
 sh 'tar -czf deploy.tar.gz bin'
 sshagent (credentials: ['2e1b7262-0912-409f-83fb-179860abee79']){
 sh 'scp deploy.tar.gz ec2-user@111.222.123.121:~/'
 sh 'ssh ec2-user@111.222.123.121 "cd ~;tar xzf deploy.tar.gz"'
 echo 'Finished!'
 }
 }
 }

Note to remember: This pipeline script just working until send the binary to the server, to run the binary as a daemon, you should make it on your own, ok? 🙂

Next, lets try to run our deployment!

Result:

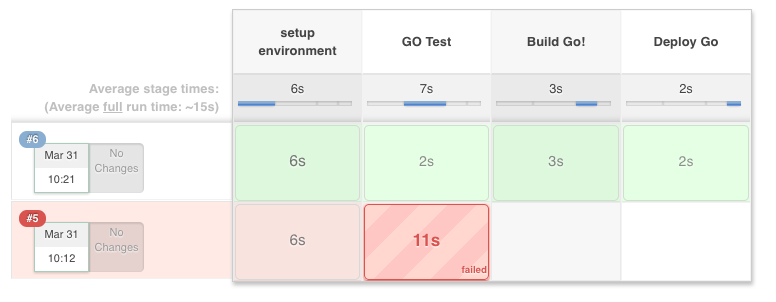
At the #5, my deployment is failed, But as you can see at the #6 my deployment is success. You can see the process log by clicking on the stage you want to see. It is more easy to understand rather than the normal Jenkins job, right?

So, that’s all for today 🙂

Hope you enjoy this. Let me know if you have some suggestion! 🙂

Failure is the beginning of success! 😀

See you!

Automation, Sytem Engineer

Integrate Sonarqube and Jenkins

Good day, everyone!

Well, today i’m going to help you integrating your sonarqube and jenkins. If you haven’t installed Sonarqube yet, you may check this link to help you first.

So next, to integrate Sonarqube with Jenkins, we need to install 2 Jenkins plugins they are Sonarqube Plugin and Quality Gates Plugin. Install those plugins via Manage Plugin page on your Jenkins.

After install the plugins, go to Jenkins Configure System page and check the Sonarqube server configurations, you can look at mine down below:

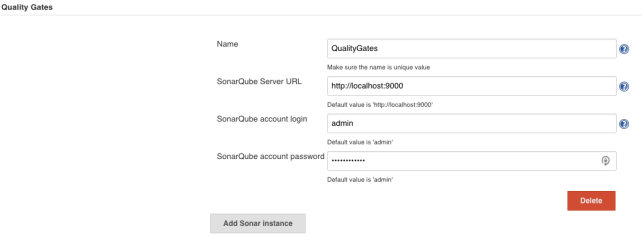
And Quality Gates configuration:

Then, open Jenkins global tool configuration page and look for Jenkins Scanner then add Jenkins scanner:

After all, let’s try to create a Jenkins Job.

On the build section, add Execute Sonarqube Scanner like below:

And on the Post-build Action add Quality Gates like below:

After that, save and try to run your Jenkins Job.

How to prove the Quality Gates?

So, to prove that our quality gates is working, let’s create a new quality gates on our Sonarqube. Here I have 2 quality gates in my Sonarqube. They are Sonarqube Way and Quality Gates Test:

On the first test to run Jenkins Job, we will use the Sonarqube Way quality gates. My project is passed the quality gates as below:

PostBuild-Step: Quality Gates plugin build passed: TRUE
Warning: you have no plugins providing access control for builds, so falling back to legacy behavior of permitting any downstream builds to be triggered
Triggering a new build of new_job_2
Finished: SUCCESS

Next, let’s try to change the quality gates for our project on Sonarqube.

Then, try to run Jenkins job again. We will see a failure notice like below:

PostBuild-Step: Quality Gates plugin build passed: FALSE
Build step 'Quality Gates' marked build as failure
Warning: you have no plugins providing access control for builds, so falling back to legacy behavior of permitting any downstream builds to be triggered
Finished: FAILURE

We can see, on the first run Quality Gates plugin build passed is TRUE and it is triggering a new build for new_job_2, while the second try Quality Gates plugin build passed is FALSE and marked build as failure and it will not triggering any job. PS: You need to add build trigger section on the job configuration setup so if a build is success it will trigger a job to run/build.

So, that’s all for today! 🙂

Please comment for any suggestion/question!

Thank you!!!

Automation, Sytem Engineer

Running Sonarqube on Mac

Good morning, Guys!

Welcome back! 🙂 Finally i have time to write something on my wordpress again 😀

So, this time i’m going to write about Sonarqube and install it on my mac. First of all, what is Sonarqube? Sonarqube is one of open source platform for continuous inspection of code quality. Sonarqube has some features that could make our development will run better, for more information about its features you may check here.

Next, You can install Sonarqube on your Mac, Windows, or linux system. You can check the requirements here. To download Sonarqube you can check here.

After download the archive file and extract it, go to your Sonarqube home directory /bin/[your environment]/

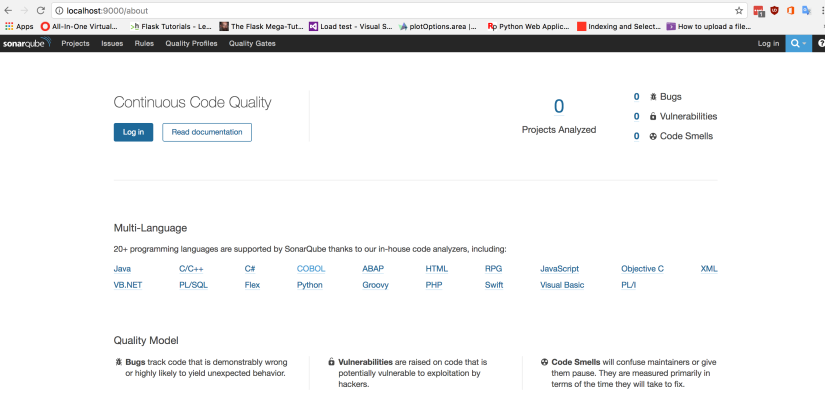
To run Sonarqube service, you can run ./sonar.sh start if everything is ok, it will start the service and run on port 9000. Now you can try to open browser and access it.

Screen Shot 2017-04-18 at 10.00.41 AM.png

So that is just the Sonarqube service that can show your code quality. Now, we need a sonar-scanner to scan our code and some sample project.

Go here to download the scanner and follow the instruction there to install it.

Now, you can try to open to your project directory and add the sonar-project.properties file in it. After that, run sonar-scanner to run the scanning process.

Here my sample project from sonarqube’s website:

javascript-sonar-runner-lcov sudo sonar-scanner
Password:
INFO: Scanner configuration file: /opt/sonar-scanner/conf/sonar-scanner.properties
INFO: Project root configuration file: /Users/rezasetiadi/Documents/setiadi/sonarqube/SonarSource-sonar-examples-07a1bd5/projects/languages/javascript/javascript-sonar-runner-lcov/sonar-project.properties
INFO: SonarQube Scanner 3.0.0.702
INFO: Java 1.8.0_121 Oracle Corporation (64-bit)
INFO: Mac OS X 10.12.3 x86_64
INFO: User cache: /var/root/.sonar/cache
INFO: Load global settings
INFO: Load global settings (done) | time=111ms
INFO: User cache: /var/root/.sonar/cache
INFO: Load plugins index
INFO: Load plugins index (done) | time=16ms
INFO: Download sonar-csharp-plugin-5.7.0.612.jar
INFO: Download sonar-java-plugin-4.5.0.8398.jar
INFO: Download sonar-flex-plugin-2.3.jar
INFO: Download sonar-php-plugin-2.9.2.1744.jar
INFO: Download sonar-scm-svn-plugin-1.4.0.522.jar
INFO: Download sonar-javascript-plugin-2.20.0.4207.jar
INFO: SonarQube server 6.3.1
INFO: Default locale: “en_US”, source code encoding: “UTF-8”
INFO: Process project properties
INFO: Load project repositories
INFO: Load project repositories (done) | time=16ms
INFO: Load quality profiles
INFO: Load quality profiles (done) | time=132ms
INFO: Load active rules
INFO: Load active rules (done) | time=972ms
INFO: Load metrics repository
INFO: Load metrics repository (done) | time=87ms
WARN: SCM provider autodetection failed. No SCM provider claims to support this project. Please use sonar.scm.provider to define SCM of your project.
INFO: Publish mode
INFO: Project key: org.sonarqube:javascript-lcov-sq-scanner
INFO: ————- Scan JavaScript :: Coverage LCOV :: SonarQube Scanner
INFO: Load server rules
INFO: Load server rules (done) | time=162ms
INFO: Language is forced to js
INFO: Initializer GenericCoverageSensor
INFO: Initializer GenericCoverageSensor (done) | time=0ms
INFO: Base dir: /Users/rezasetiadi/Documents/setiadi/sonarqube/SonarSource-sonar-examples-07a1bd5/projects/languages/javascript/javascript-sonar-runner-lcov
INFO: Working dir: /Users/rezasetiadi/Documents/setiadi/sonarqube/SonarSource-sonar-examples-07a1bd5/projects/languages/javascript/javascript-sonar-runner-lcov/.scannerwork
INFO: Source paths: sources
INFO: Test paths: tests
INFO: Source encoding: UTF-8, default locale: en_US
INFO: Index files
INFO: 6 files indexed
INFO: Quality profile for js: Sonar way
INFO: Sensor NoSonar Sensor [php]
INFO: Sensor NoSonar Sensor [php] (done) | time=1ms
INFO: Sensor Coverage Report Import [csharp]
INFO: Sensor Coverage Report Import [csharp] (done) | time=0ms
INFO: Sensor Coverage Report Import [csharp]
INFO: Sensor Coverage Report Import [csharp] (done) | time=0ms
INFO: Sensor Unit Test Results Import [csharp]
INFO: Sensor Unit Test Results Import [csharp] (done) | time=0ms
INFO: Sensor XmlFileSensor [java]
INFO: Sensor XmlFileSensor [java] (done) | time=0ms
INFO: Sensor Analyzer for “php.ini” files [php]
INFO: Sensor Analyzer for “php.ini” files [php] (done) | time=3ms
INFO: Sensor JavaScript Squid Sensor [javascript]
INFO: 4 source files to be analyzed
WARN: Since SonarQube 6.2 property ‘sonar.javascript.lcov.reportPath’ is deprecated. Use ‘sonar.javascript.lcov.reportPaths’ instead.INFO: 4/4 source files have been analyzed

INFO: Unit Test Coverage Sensor is started
INFO: Analysing [/Users/rezasetiadi/Documents/setiadi/sonarqube/SonarSource-sonar-examples-07a1bd5/projects/languages/javascript/javascript-sonar-runner-lcov/report/lcov.dat]
INFO: Integration Test Coverage Sensor is started
INFO: Overall Coverage Sensor is started
INFO: Analysing [/Users/rezasetiadi/Documents/setiadi/sonarqube/SonarSource-sonar-examples-07a1bd5/projects/languages/javascript/javascript-sonar-runner-lcov/report/lcov.dat]
INFO: Sensor JavaScript Squid Sensor [javascript] (done) | time=503ms
INFO: Sensor Zero Coverage Sensor
INFO: Sensor Zero Coverage Sensor (done) | time=15ms
INFO: Sensor Code Colorizer Sensor
INFO: Sensor Code Colorizer Sensor (done) | time=1ms
INFO: Sensor CPD Block Indexer
INFO: org.sonar.scanner.cpd.deprecated.DefaultCpdBlockIndexer@48106381 is used for js
INFO: Sensor CPD Block Indexer (done) | time=1ms
INFO: No SCM system was detected. You can use the ‘sonar.scm.provider’ property to explicitly specify it.
INFO: Calculating CPD for 4 files
INFO: CPD calculation finished
INFO: Analysis report generated in 115ms, dir size=31 KB
INFO: Analysis reports compressed in 19ms, zip size=15 KB
INFO: Analysis report uploaded in 284ms
INFO: ANALYSIS SUCCESSFUL, you can browse http://localhost:9000/dashboard/index/org.sonarqube:javascript-lcov-sq-scanner
INFO: Note that you will be able to access the updated dashboard once the server has processed the submitted analysis report
INFO: More about the report processing at http://localhost:9000/api/ce/task?id=AVt_C73HBpklGzlph9bP
INFO: Task total time: 4.003 s
INFO: ————————————————————————
INFO: EXECUTION SUCCESS
INFO: ————————————————————————
INFO: Total time: 11.533s
INFO: Final Memory: 50M/343M
INFO: ————————————————————————

After execution is success, now let’s check our Sonarqube website:

Screen Shot 2017-04-18 at 10.14.24 AM.png

You can see that our sample project is passed the quality gate provided by Sonarqube. You can see each detail of the scan result. If you find something wrong with the code or your code is not passed the test, go tell your developer to fix it 😀 🙂

So, guys, that’s all for today. Next time i will try to make a post about integrate Sonarqube with Jenkins Server so we could make a better continuous integration in our development.

збогом.